In this workshop we’re going to learn how to deploy mongoDB and mongo-express. It can be applied to any other setup for creating a stateless Kubernetes Applications. We will go through the following steps:
-
Create MongoDB Pod with Kubernetes Deployment.
-
Create internal Service. Internal Service constricts the Pod to no external requests allowed to access it, only the Pods within the same cluster.
-
Create Mongo Express Deployment. The Mongo Express will connect with the database via URL and credentials- username and password of database. It will be accessible from Env variables on Deployment configuration.
-
Create a ConfigMap that will contain the database URL and a Secret for credentials with references from Deployment.
-
External Service will allow external requests to talk to the Pod. URL will contain http protocol, IP Address of Node and Port of the external Service.
The communication through k8s Components
The request will start from the browser to Mongo Express External Service which will forward it to Mongo Express Pod. The Pod will connect to MongoDB Internal Service via database URL and authenticate to MongoDB with database credentials.
Kubernetes Architecture diagram
List created Kubernetes Components
After deleting the Deployment and Service from the first workshop the cluster is empty.
kubectl get all
# NAME                 TYPE        CLUSTER-IP   EXTERNAL-IP   PORT(S)   AGE
# service/kubernetes   ClusterIP   10.96.0.1    <none>        443/TCP   30m
After creating the Deployment and Service for one application you will see the following k8s Components:
kubectl get all | grep mongodb # filter by the name of your app
# pod/mongodb-deployment-7bd745589d-pt2kl   1/1     Running   0          70m
# service/mongodb-service   ClusterIP   10.102.163.220   <none>        27017/TCP   15m
# deployment.apps/mongodb-deployment   1/1     1            1           70m
# replicaset.apps/mongodb-deployment-7bd745589d   1         1         1       70m
Create MongoDB Deployment/Pod
Create Deployment file either with editor or command line
kubectl create deployment mongodb-deployment –image=mongoNow edit the deployment and remove the default configuration:
kubectl edit deployment mongodb-deploymentWith vim editor interactive mode, delete the multiline with following commands:
# syntax :\[start\],\[end\]d
:.,$d # all the lines after the cursor
:.,1d # all the lines above the cursor
:3,10d # remove lines between 3 and 10
The Deployment should look similar to this:
apiVersion: apps/v1
kind: Deployment
metadata:
  labels:
    app: mongodb-deployment
  name: mongodb-deployment
spec:
  replicas: 1
  selector:
    matchLabels:
      app: mongodb-deployment
  template:
    metadata:
      creationTimestamp: null
      labels:
        app: mongodb-deployment
    spec: # Pods that Deployment will create
      containers:
      - image: mongo
        name: mongodb
Connect to MongoDB from another Docker container
Image configuration for MongoDB https://hub.docker.com/_/mongo
The MongoDB server in the image listens on the standard MongoDB port, 27017
Environment Variables
The info about environmental variables and port on the image configuration are on Docker hub.
For the authentication of database we’re going to use two environmental variables:
MONGO_INITDB_ROOT_USERNAME, MONGO_INITDB_ROOT_PASSWORD
Let’s add it to the Deployment configuration:
   template:
    metadata:
      labels:
        app: mongodb-deployment
    spec:
      containers:
      - image: mongo
        name: mongodb
        ports:
        - containerPort: 27017
        env:
        - name: MONGO\_INITDB\_ROOT\_USERNAME
          value:
        - name: MONGO\_INITDB\_ROOT\_PASSWORD
          value:
We’re going to create the k8s Secrets where these env values will be referenced from, so no one would have access to it from the code repository.
Create Kubernetes Secret
If you’re using VSCode for creation of the K8s configuration files the autofill of YAML files via JSON Kubernetes schema will look similar to this:
# secret.yaml
apiVersion: v1
kind: Secret
metadata:
  name: mysecret
type: Opaque # key value secret type, others are for secrets for TLS certificate and other types
data:
  password: <Password>
Correct the name and secret data. Keep in mind that secret values aren’t plain text but base64 encoded values.
Storing the data in the Secret component doesn’t automatically make it secure.
There are built-in mechanisms like encryption for basic security, which aren’t enabled by default.
echo -n 'user' | base64 # encrypt the valueCopy paste it to the Secret data values:
apiVersion: v1
kind: Secret
metadata:
  name: mongodb-secret
type: Opaque
data:
  mongo-root-username: dXNlcg==
  mongo-root-password: cGFzc3c=
  mongo-basic-username: dXNlcg==
  mongo-basic-password: cGFzc3c=
The Secret must be created first before creating a Deployment in Kubernetes in order to use that Secret values.
kubectl apply -f mongo-secret.yaml
kubectl get secret
# NAME             TYPE     DATA   AGE
# mongodb-secret   Opaque   2      24s
Create a Deployment
Now we can edit the Deployment configuration to use the new Secret.
 template:
    metadata:
      labels:
        app: mongodb-deployment
    spec:
      containers:
      - image: mongo
        name: mongodb
        ports:
        - containerPort: 27017
        env:
        - name: MONGO\_INITDB\_ROOT\_USERNAME
          valueFrom: # reference values from the secret
           secretKeyRef:
            name: mongodb-secret
            key: mongo-root-username
        - name: MONGO\_INITDB\_ROOT\_PASSWORD
          valueFrom:  # reference values from the secret
           secretKeyRef:
            name: mongodb-secret
            key: mongo-root-password
       - name: ME\_CONFIG\_BASICAUTH\_USERNAME
          valueFrom:
              secretKeyRef:
                name: mongodb-secret
                key: mongo-basic-username
        - name: ME\_CONFIG\_BASICAUTH\_PASSWORD
          valueFrom:
              secretKeyRef:
                name: mongodb-secret
                key: mongo-basic-password
Create the deployment with this configuration:
kubectl apply -f mongo-deployment.yaml
kubectl get all
# NAME                                      READY   STATUS    RESTARTS   AGE
# pod/mongodb-deployment-7bd745589d-pt2kl   1/1     Running   0          81s
# NAME                 TYPE        CLUSTER-IP   EXTERNAL-IP   PORT(S)   AGE
# service/kubernetes   ClusterIP   10.96.0.1    <none>        443/TCP   3h40m
# NAME                                 READY   UP-TO-DATE   AVAILABLE   AGE
# deployment.apps/mongodb-deployment   1/1     1            1           82s
# NAME                                            DESIRED   CURRENT   READY   AGE
# replicaset.apps/mongodb-deployment-7bd745589d   1         1         1       81s
Now you should see the Pod, Deployment and ReplicaSet created.
Debugging
If container creation is slow and kubectl get pod gives the Pod status ContainerCreating, you can follow the progress with command kubectl get pod –watch or see if there is a problem with command kubectl describe pod POD_NAME.
kubectl get pod
# NAME                                  READY   STATUS    RESTARTS   AGE
# mongodb-deployment-7bd745589d-pt2kl   1/1     Running   0          2m13s
Kubernetes Service Types
kubectl create service --help
# Aliases:
# service, svc

# Available Commands:
# clusterip      Create a ClusterIP service
# externalname   Create an ExternalName service
# loadbalancer   Create a LoadBalancer service
# nodeport       Create a NodePort service

# Usage:
#   kubectl create service \[flags\] \[options\]
ClusterIP
ClusterIP is the default service type. Kubernetes will assign a cluster-internal IP address to ClusterIP service. This makes the service only reachable within the cluster and no other requests to service pods are allowed from outside the cluster. You can optionally set cluster IP in the service definition file.
ClusterIP Service is the most common service for communication between the front-end and back-end applications or, for example, when a microservice that processes data and sends it to another microservice, ClusterIP service is required to restrain the communication.
apiVersion: v1
kind: Service
metadata:
  name: my-backend-service
spec:
  type: ClusterIP # Optional field (default), other options are NodePort or LoadBalancer
  clusterIP: 10.10.0.1 # within service cluster ip range
  ports:
  - name: http
    protocol: TCP
    port: 80
    targetPort: 8080
NodePort
NodePort service is an extension of ClusterIP services enabling external connectivity to the Kubernetes Application. With NodePort Kubernetes uses a designated port that forwards traffic to the corresponding ClusterIP service running on the node.
These services are allowing communication from outside the cluster, such as web applications or APIs. To make the node port available, Kubernetes sets up a cluster IP address, the same as if you had requested a Service of type: ClusterIP, node’s IP address and the port number assigned to the service. Kubernetes port number is predefined that is custom or in range of 30000-32767.
LoadBalancer
LoadBalancer services are for applications that need to handle high traffic volumes, such as web applications or APIs. It exposes the Service externally using an external load balancer. Kubernetes does not directly offer a load balancing component; you must provide one, or you can integrate your Kubernetes cluster with a cloud provider.
More information about Services: https://kubernetes.io/docs/concepts/services-networking/service/
Create internal Service
For adding a Service create a new yaml file or include it in the Deployments configuration. In yaml it is possible to include multiple documents in one file with a file separator of three dashes.
# mongo-deployment.yaml EOF
---
apiVersion: v1
kind: Service
metadata:
  name: mongodb-service
spec:
  selector:
    app: mongodb
  ports:
    - protocol: TCP
      port: 27017 # Service port
      targetPort: 27017 # Pod or container port
Now apply the changes to both deployment and service:
kubectl apply -f mongo-deployment.yaml
service/mongodb-service created
If you’re trying to apply the new Service to the Pod and decide to change the Application’s name after Deployment is created, labeling will fail with immutable state errors, such as:
The Deployment "mongodb-deployment" is invalid: spec.selector: Invalid value: v1.LabelSelector{MatchLabels:map\[string\]string{"app":"mongodb"}, MatchExpressions:\[\]v1.LabelSelectorRequirement(nil)}: field is immutableNow verify the newly created ClusterIP service with command:
kubectl get service
# NAME              TYPE        CLUSTER-IP       EXTERNAL-IP   PORT(S)     AGE
# kubernetes        ClusterIP   10.96.0.1        <none>        443/TCP     4h38m
# mongodb-service   ClusterIP   10.102.163.220   <none>        27017/TCP   4m49s
Get more information about the service:
kubectl describe service mongodb-service
# Name:              mongodb-service
# Namespace:         default
# Labels:            <none>
# Annotations:       <none>
# Selector:          app=mongodb-deployment
# Type:              ClusterIP
# IP Family Policy:  SingleStack
# IP Families:       IPv4
# IP:                10.102.163.220
# IPs:               10.102.163.220
# Port:              <unset>  27017/TCP
# TargetPort:        27017/TCP
# Endpoints:         10.244.0.6:27017
# Session Affinity:  None
# Events:            <none>
Endpoint is an IP address of a Pod and the port where the Application in Pod is listening. Verify if the Service is attached to the right Pod by looking up IP address of a Pod:
kubectl get pod -o wide
# NAME                                  READY   STATUS    RESTARTS   AGE   IP           NODE       NOMINATED NODE   READINESS GATES
# mongodb-deployment-7bd745589d-pt2kl   1/1     Running   0          65m   10.244.0.6   minikube   <none>           <none>
Create Mongo Express Deployment/Pod
The Deployment configuration will look similar to the mongoDB:
apiVersion: apps/v1
kind: Deployment
metadata:
  labels:
    app: mongo-express
  name: mongo-express
spec:
  replicas: 1
  selector:
    matchLabels:
      app: mongo-express
  template:
      metadata:
        labels:
          app: mongo-express
      spec:
        containers:
        - image: mongo
          name: mongo-express
Image info about the port and the env variables: https://hub.docker.com/_/mongo-express
The Mongo Express Application inside the container starts with 8081 port. In Mongo Express we need to set env variables:
-
for which database the application will connect to, which is MongoDB address / Internal Service- from the Docker hub find the env variable ME_CONFIG_MONGODB_SERVER referenced from configMap
-
credentials to authenticate the connection which is ME_CONFIG_MONGODB_ADMINUSERNAME and ME_CONFIG_MONGODB_ADMINPASSWORD referenced from Secrets
Create the ConfigMap
Since we need the configMap for referencing the URL to the MongoDB internal service, it has to be created first prior to creating a Mongo Express Deployment.
apiVersion: v1
kind: ConfigMap
metadata:
  name: mongodb-configmap
data:
  database\_url: mongodb-service #service name
Apply the configMap to the k8s state:
kubectl apply -f mongo-configmap.yamlThe configMap will be referenced to Deployment env variables similar to Secrets:
  template:
      metadata:
        labels:
          app: mongo-express
      spec:
        containers:
        - image: mongo
          name: mongo-express
          ports:
          - containerPort: 8081
          env:
          - name: ME_CONFIG_MONGODB_ADMINUSERNAME
            valueFrom:
                secretKeyRef:
                  name: mongodb-secret
                  key: mongo-root-username
          - name: ME_CONFIG_MONGODB_ADMINPASSWORD
            valueFrom:
                secretKeyRef:
                  name: mongodb-secret
                  key: mongo-root-password
          - name: ME_CONFIG_MONGODB_SERVER
            valueFrom:
                configMapKeyRef:
                  name: mongodb-configmap
                  key: database_url
Create the Pod for Mongo Express
kubectl apply -f mongo-express.yaml
# deployment.apps/mongo-express created
kubectl get pod
# NAME                                  READY   STATUS    RESTARTS   AGE
# mongo-express-cbc554bd4-86h75         1/1     Running   0          26s
# mongodb-deployment-68f8db65c6-hst86   1/1     Running   0          24m
kubectl logs mongo-express-cbc554bd4-86h75 #verify that database is connected
# No custom config.js found, loading config.default.js
# Welcome to mongo-express
#------------------------
# Mongo Express server listening at http://0.0.0.0:8081
# Server is open to allow connections from anyone (0.0.0.0)
Create an External Service
Add an External Service type LoadBalancer for accessing Mongo Express from the browser. It will be added to the Deployment configuration:
# mongo-express.yaml EOF
---
apiVersion: v1
kind: Service
metadata:
  name: mongo-express-service
spec:
  selector:
    app: mongo-express
  type: LoadBalancer
  ports:
    - protocol: TCP
      port: 8081 # Service port
      targetPort: 8081 # Pod or container port
      nodePort: 30000 # open external IP address port
The type LoadBalancer, aka External Service accepts external requests by assigning the service an external IP address.
kubectl apply -f mongo-express.yaml
kubectl get service
# NAME                    TYPE           CLUSTER-IP       EXTERNAL-IP   PORT(S)          AGE
# kubernetes              ClusterIP      10.96.0.1        <none>        443/TCP          5h32m
# mongo-express-service   LoadBalancer   10.109.105.73    <pending>     8081:30000/TCP   9s
# mongodb-service         ClusterIP      10.102.163.220   <none>        27017/TCP        58m
In minikube external IP address is assigned with one additional command:
minikube service mongo-express-service
# |-----------|-----------------------|-------------|---------------------------|
# | NAMESPACE |         NAME          | TARGET PORT |            URL            |
# |-----------|-----------------------|-------------|---------------------------|
# | default   | mongo-express-service |        8081 | http://123.123.12.2:30000 |
# |-----------|-----------------------|-------------|---------------------------|
# 🎉  Opening service default/mongo-express-service in default browser...
Now you should be able to access the Application on browser, login with decoded basic auth credentials referenced on Secret.

Pod access in Kubernetes Applications
CRUD operations on this Application, e.g. creating a database will follow the process:
-
Request by the External Service of Mongo Express forwards the request to the Mongo Express Pod.
-
Mongo Express is connected to Mongo DB Internal Service where it will forward the request to the MongoDB Pod.
-
The MongoDB database is updated with the requested changes.
With this setup we learned how to create simple Kubernetes Components to build a basic Web Application and its database in the Kubernetes cluster.
Troubleshooting
If the Container isn’t starting, compare the schema of the configuration files. Try to delete the deployments, edit the secrets, configMap, and redeploy again.
If the connection with the cluster is unstable, either because of the low system resources or the problems with hypervisor, try to switch to another virtual environment and check the system requirements for the minikube.
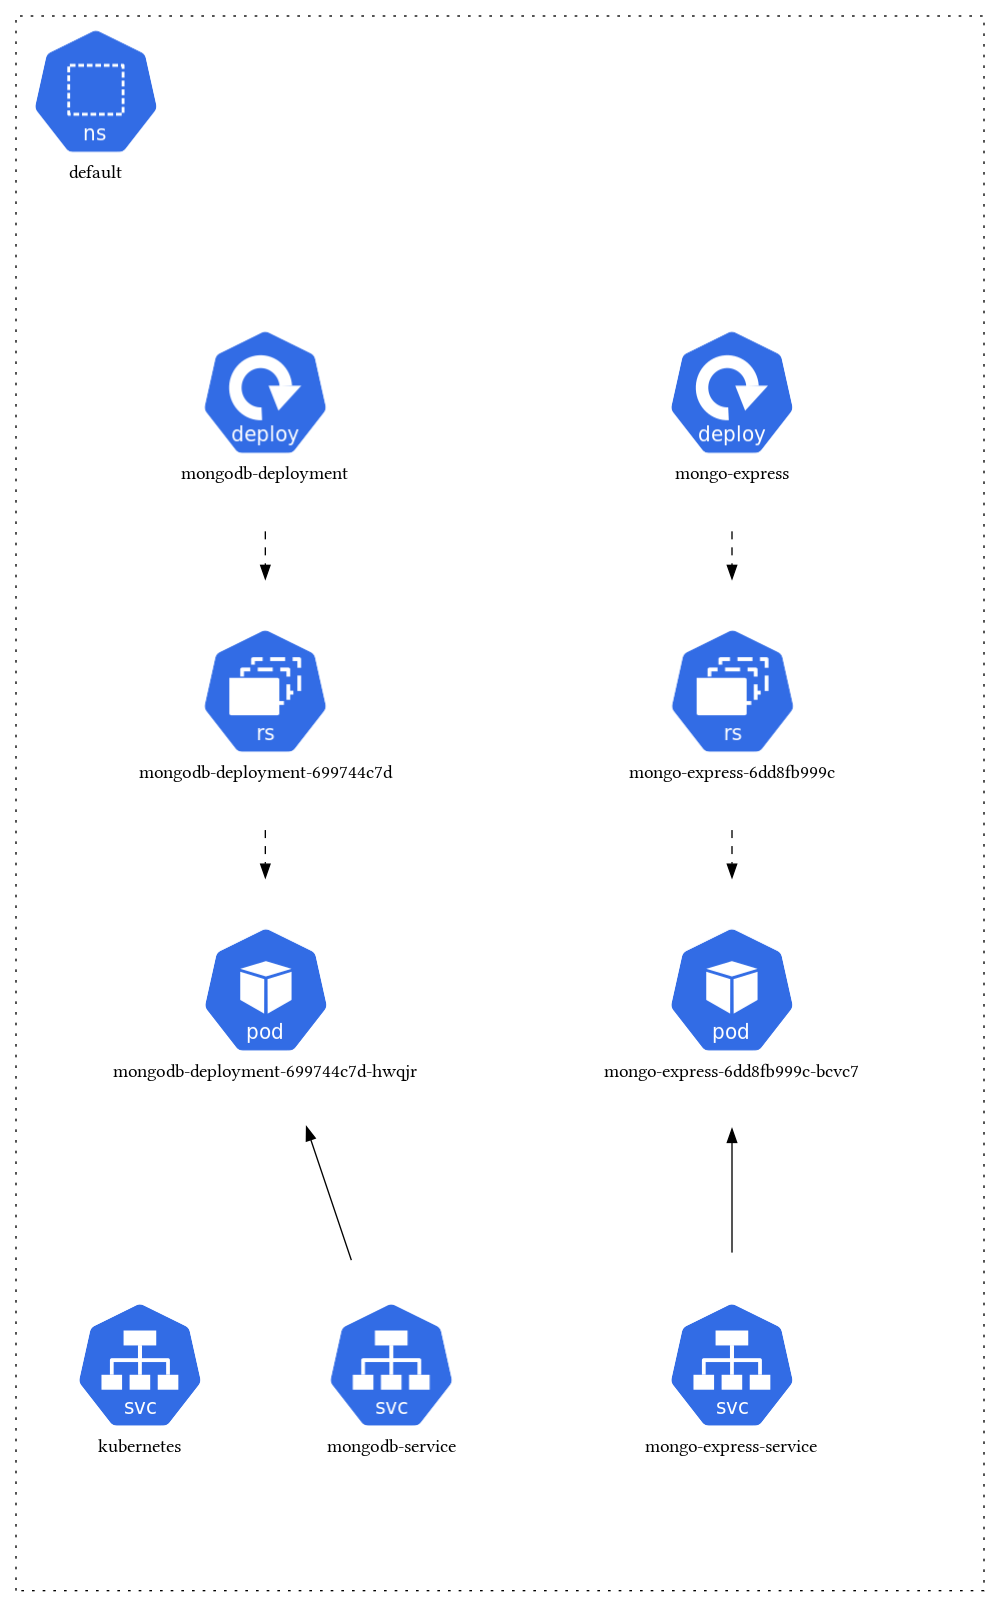
The Kubernetes diagrams from the actual state in a namespace has been generated, reference.
The config for this workshop is available on GitHub https://github.com/sintijab/Kubernetes-Workshop